
vue源码分析(十) 编译之解析(parse)——parseHTML
# 1. 概述
parseHTML 主要作用是解析 HTML 模板,我们进入 src/compiler/parser/html-parser.js 文件可以发现, Vue 的编译也是在开源库 simplehtmlparser (opens new window) 的基础上优化和完善的。接下来我们详细分析每一部分。
分析 parseHTML 源码,我们还是以 第九章 (opens new window) 的案例代码为例进行,如下:
<!DOCTYPE html>
<html lang="en">
<head>
  <meta charset="UTF-8">
  <meta name="viewport" content="width=device-width, initial-scale=1.0">
  <title>parse</title>
  <script src="./vue.js"></script>
</head>
<body>
  <div id="app">{{ fullName }}</div>
    <script>
      new Vue({
        el: '#app',
        template: `
          <ul :class="classObject" class="list" v-show="isShow">
            <li v-for="(l, i) in list" :key="i" @click="clickItem(index)">{{ i }}:{{ l }}</li>
          </ul>
        `,
        data: {
          isShow: true,
          list: ['Vue', 'React', 'Angular'],
          classObject: {
            active: true,
            'text-danger': false
          }
        },
        methods: {
          clickItem(index) {
            console.log(index)
          }
        }
      })
    </script>
</body>
</html>
2
3
4
5
6
7
8
9
10
11
12
13
14
15
16
17
18
19
20
21
22
23
24
25
26
27
28
29
30
31
32
33
34
35
# 2. html-parser
# 2.1 正则分析
html-parser 一开始就定义了一些正则表达式,下面我们详细分析一下每个正则表达式的主要作用,代码如下:
源码目录:src/compiler/parser/html-parser.js
const attribute = /^\s*([^\s"'<>\/=]+)(?:\s*(=)\s*(?:"([^"]*)"+|'([^']*)'+|([^\s"'=<>`]+)))?/
const dynamicArgAttribute = /^\s*((?:v-[\w-]+:|@|:|#)\[[^=]+\][^\s"'<>\/=]*)(?:\s*(=)\s*(?:"([^"]*)"+|'([^']*)'+|([^\s"'=<>`]+)))?/
const ncname = `[a-zA-Z_][\\-\\.0-9_a-zA-Z${unicodeRegExp.source}]*`
const qnameCapture = `((?:${ncname}\\:)?${ncname})`
const startTagOpen = new RegExp(`^<${qnameCapture}`)
const startTagClose = /^\s*(\/?)>/
const endTag = new RegExp(`^<\\/${qnameCapture}[^>]*>`)
const doctype = /^<!DOCTYPE [^>]+>/i
// #7298: escape - to avoid being passed as HTML comment when inlined in page
const comment = /^<!\--/
const conditionalComment = /^<!\[/
2
3
4
5
6
7
8
9
10
11
attribute:匹配标签的属性(attributes),例如a="xx" @a="xx" @click='xxx' v-on:click="xx" filterable等属性dynamicArgAttribute:正则匹配 动态的属性写法 ,例如@[x]="handle1" v-on[x]="" :[x]=""等属性ncname:不包含前缀的XML标签名称。关于ncname的可以移步 这里 (opens new window) 学习qnameCapture:捕获的内容就是整个qname名称,即整个标签的名称startTagOpen:用来匹配开始标签的一部分,这部分包括:<以及后面的标签名称startTagClose:用来匹配开始标签的<以及标签的名字,但是并不包括开始标签的闭合部分,即:>或者/>,由于标签可能是一元标签,所以开始标签的闭合部分有可能是/>,比如:<br/>,如果不是一元标签,此时就应该是:>endTag:匹配结束标签doctype:匹配文档的DOCTYPE标签comment:来匹配注释节点conditionalComment:匹配条件注释节点至此,我们已经把所有的正则表达式分析完了,接下来我们分析一些常量的定义。
# 2.2 常量分析
源码如下:
源码目录:src/compiler/parser/html-parser.js
export const isPlainTextElement = makeMap('script,style,textarea', true)
const reCache = {}
const decodingMap = {
'<': '<',
'>': '>',
'"': '"',
'&': '&',
' ': '\n',
'	': '\t',
''': "'"
}
const encodedAttr = /&(?:lt|gt|quot|amp|#39);/g
const encodedAttrWithNewLines = /&(?:lt|gt|quot|amp|#39|#10|#9);/g
// #5992
const isIgnoreNewlineTag = makeMap('pre,textarea', true)
const shouldIgnoreFirstNewline = (tag, html) => tag && isIgnoreNewlineTag(tag) && html[0] === '\n'
function decodeAttr (value, shouldDecodeNewlines) {
const re = shouldDecodeNewlines ? encodedAttrWithNewLines : encodedAttr
return value.replace(re, match => decodingMap[match])
}
2
3
4
5
6
7
8
9
10
11
12
13
14
15
16
17
18
19
20
21
22
23
我们从这段代码中把所有定义的常量罗列出来一一分析,如下:
isPlainTextElement: 检测给定的标签名字是不是纯文本标签(包括:script、style、textarea)reCache: 缓存decodingMap: 一个字面量对象,key是一些特殊的html实体,值则是这些实体对应的字符encodedAttr: 匹配'<', '>', '"', '&', "'"encodedAttrWithNewLines: 匹配'<', '>', '"', '&', "'", '\n', '\t'isIgnoreNewlineTag: 检测给定的标签是否是<pre>标签或者<textarea>标签
shouldIgnoreFirstNewline: 判断是否应该忽略标签内容的第一个换行符的,如果满足:标签是pre或者textarea且标签内容的第一个字符是换行符,则返回true,否则为falsedecodeAttr: 将html实体转为对应的字符
分析完上面两部分,接下来我们分析这章最主要的一个方法 parseHTML,它的主要作用是解析 HTML。在分析之前我们先用伪代码的形式,来分析一下 parseHTML 有哪些逻辑,代码如下:
export function parseHTML (html, options) {
  // 定义一些常量和变量
  const xxx

  // 开启一个 while 循环,循环结束的条件是 html 为空,即 html 被 parse 完毕
  while (html) {
    last = html

    if (!lastTag || !isPlainTextElement(lastTag)) {
      // 确保即将 parse 的内容不是在纯文本标签里 (script,style,textarea)
    } else {
      // 即将 parse 的内容是在纯文本标签里 (script,style,textarea)
    }

    // 将整个字符串作为文本对待
    if (html === last) {
      options.chars && options.chars(html)
      if (process.env.NODE_ENV !== 'production' && !stack.length && options.warn) {
        options.warn(`Mal-formatted tag at end of template: "${html}"`)
      }
      break
    }
  }

  // 调用 parseEndTag 函数
  parseEndTag()

  // advance 函数
  function advance (n) {
    // ...
  }

  // parseStartTag 函数用来 parse 开始标签
  function parseStartTag () {
    // ...
  }
  // handleStartTag 函数用来处理 parseStartTag 的结果
  function handleStartTag (match) {
    // ...
  }
  // parseEndTag 函数用来 parse 结束标签
  function parseEndTag (tagName, start, end) {
    // ...
  }
}
2
3
4
5
6
7
8
9
10
11
12
13
14
15
16
17
18
19
20
21
22
23
24
25
26
27
28
29
30
31
32
33
34
35
36
37
38
39
40
41
42
43
44
45
从上面的伪代码我们可以看出,parseHTML 主要逻辑是:
(1) 、定义变量
(2) 、while 循环处理 html 模板
(3) 、定义一些内部方法
接下来我们详细来分析,每个部分的逻辑代码主要做的事情。
# 2.3 parseHTML
说明:关于 parseHTML 我们会在下一小节做详细分析。
# 3. parseHTML
# 3.1 参数列表
首先我们来看一下参数列表,代码如下:
源码目录:src/compiler/parser/html-parser.js
export function parseHTML (html, options) {
  /* */
}
2
3
这个函数的参数主要有两个 html 和 options,其中:
html :就是我们的模板字符串即当前案例中的 template 所对应的 html 片段;
options :不同平台的配置即 parser;
说明:关于 options 的每一项的作用请参考下面代码注释。
源码目录:src/compiler/parser/index.js
{
  // 警告日志函数
  warn,
  // 标志是html,是true
  expectHTML: options.expectHTML,
  // 匹配标签是否是 'area,base,br,col,embed,frame,hr,img,input,isindex,keygen, link,meta,param,source,track,wbr'
  isUnaryTag: options.isUnaryTag,
  // 判断标签是否是 'colgroup,dd,dt,li,options,p,td,tfoot,th,thead,tr,source'
  canBeLeftOpenTag: options.canBeLeftOpenTag,
  // IE在属性值中编码换行,而其他浏览器则不会
  shouldDecodeNewlines: options.shouldDecodeNewlines,
  // true chrome在a[href]中编码内容
  shouldDecodeNewlinesForHref: options.shouldDecodeNewlinesForHref,
  // 当设为 true 时,将会保留且渲染模板中的 HTML 注释。默认行为是舍弃它们
  shouldKeepComment: options.comments,
  outputSourceRange: options.outputSourceRange,
   /**
     * 标签开始函数,
     * 创建一个ast标签dom,判断获取v-for属性是否存在如果有则转义 v-for指令把for,alias,iterator1,iterator2属性添加到虚拟dom中
     * 获取v-if属性,为el虚拟dom添加 v-if,v-eles,v-else-if 属性
     * 获取v-once 指令属性,如果有有该属性为虚拟dom标签标记事件只触发一次则销毁
     * 校验属性的值,为el添加muted, events,nativeEvents,directives,  key, ref,slotName或者slotScope或者slot,component或者inlineTemplate 属性
     * 标志当前的currentParent当前的 element
     * 为parse函数 stack标签堆栈 添加一个标签
     * @param {标签名称} tag
     * @param {标签属性} attrs
     * @param {如果不是单标签则为真} unary
     * @param {开始} start
     * @param {结束} end
     */
   start (tag, attrs, unary, start, end) {},
   /**
     * 为标签元素对象做闭环处理,
     * 从stack中删除AST模型对象,
     * 更新当前的parent对象等
     * @param {标签名称} tag
     * @param {开始} start
     * @param {结束} end
     */
   end (tag, start, end) {},
   /**
     * 字符处理
     * @param {文本} text
     * @param {开始} start
     * @param {结束} end
     */
   chars (text: string, start: number, end: number) {},
   /**
     * 把text添加到属性节点或者添加到注释节点,ast模板数据
     * @param {文本} text
     * @param {开始} start
     * @param {结束} end
     */
   comment (text: string, start, end) {}
}
2
3
4
5
6
7
8
9
10
11
12
13
14
15
16
17
18
19
20
21
22
23
24
25
26
27
28
29
30
31
32
33
34
35
36
37
38
39
40
41
42
43
44
45
46
47
48
49
50
51
52
53
54
55
# 3.2 变量分析
接下方法一开始就定义了一些变量,如下:
源码目录:src/compiler/parser/html-parser.js
const stack = []
const expectHTML = options.expectHTML
const isUnaryTag = options.isUnaryTag || no
const canBeLeftOpenTag = options.canBeLeftOpenTag || no
let index = 0
let last, lastTag
2
3
4
5
6
这里每个变量的作用分别是:
stack: 一个空数组,在while循环中处理html字符串的时候每当遇到一个非一元标签,都会将该开始标签 push 到该数组expectHTML:isUnaryTag: 检测一个标签是否是一元标签canBeLeftOpenTag: 检测一个标签是否是可以省略闭合标签的非一元标签index: 当前字符串的读入位置last: 存储剩余还未parse的html字符串lastTag: 终存储着位于stack栈顶的元素接下来是循环
html进行模板编译,同样我们用伪代码的形式,总结一下循环体的逻辑,如下:源码目录:
src/compiler/parser/html-parser.js
while (html) {
  last = html

  if (!lastTag || !isPlainTextElement(lastTag)) {
    // 确保即将 parse 的内容不是在纯文本标签里 (script,style,textarea)
    let textEnd = html.indexOf('<')

    if (textEnd === 0) {
      // textEnd === 0 的情况

      // Comment:
      if (comment.test(html)) {
        // 有可能是注释节点
      }

      if (conditionalComment.test(html)) {
        // 有可能是条件注释节点
      }

      // Doctype:
      const doctypeMatch = html.match(doctype)
      if (doctypeMatch) {
        // doctype 节点
      }

      // End tag:
      const endTagMatch = html.match(endTag)
      if (endTagMatch) {
        // 结束标签
      }

      // Start tag:
      const startTagMatch = parseStartTag()
      if (startTagMatch) {
        // 开始标签
      }
    }

    let text, rest, next
    if (textEnd >= 0) {
      // textEnd >= 0 的情况
    }

    if (textEnd < 0) {
      // textEnd < 0 的情况
    }

    if (options.chars && text) {
      options.chars(text)
    }
  } else {
    // 即将 parse 的内容是在纯文本标签里 (script,style,textarea)
  }

  // 将整个字符串作为文本对待
  if (html === last) {
    options.chars && options.chars(html)
    if (process.env.NODE_ENV !== 'production' && !stack.length && options.warn) {
      options.warn(`Mal-formatted tag at end of template: "${html}"`)
    }
    break
  }
}
2
3
4
5
6
7
8
9
10
11
12
13
14
15
16
17
18
19
20
21
22
23
24
25
26
27
28
29
30
31
32
33
34
35
36
37
38
39
40
41
42
43
44
45
46
47
48
49
50
51
52
53
54
55
56
57
58
59
60
61
62
63
从上面的伪代码我们可以清晰的看到,以下的业务逻辑:
textEnd === 0的情况,例如<div>div1</div>- 可能是注释节点:
<!--xx--> - 可能是条件注释节点:
<![ ]> - 可能是
doctype:<!DOCTYPE html> - 可能是结束标签:
<div> - 可能是开始标签:
</div>
- 可能是注释节点:
textEnd >= 0的情况,例如<123textEnd < 0的情况,例如text
说明:关于上面的业务逻辑我们会在下面的分小节详细分析,这里就不多做说明。
# 3.3 注释节点
接下来我们看一下解析注释节点的源码,如下:
源码目录:src/compiler/parser/html-parser.js
// Comment:
if (comment.test(html)) {
  const commentEnd = html.indexOf('-->')

  if (commentEnd >= 0) {
    if (options.shouldKeepComment) {
      options.comment(html.substring(4, commentEnd), index, index + commentEnd + 3)
    }
    advance(commentEnd + 3)
    continue
  }
}
2
3
4
5
6
7
8
9
10
11
12
对于解析注释节点,主要做了一下几件事情:
- 匹配注释节点开始位置
<!-- - 获取注释节点的结束位置
-->的索引值 - 是否保留注释节点
- 调用
comment方法解析注释节点 - 调用
advance方法将解析完的注释节点从模板中移除 continue继续循环解析模板
说明:关于 comment 我们会在下面的分小节详细分析,这里就不多做说明。
comment 参数说明:
我们已 <!-- xxx --> 注释节点为例进行分析:
html = '<!-- xxx -->'
html.substring(4, commentEnd) // 此处的 commentEnd 为 html.indexOf('-->') 即为 9,截取的结果为:" ccc "
index: 0 // 字符串开始位置
index + commentEnd + 3 // 0+9+3 = 12 即字符串的长度
2
3
4
advance 方法说明:
源码目录:src/compiler/parser/html-parser.js
/**
 * 截取字符串
 * @param {开始位置} n
 */
function advance (n) {
  index += n
  html = html.substring(n)
}
2
3
4
5
6
7
8
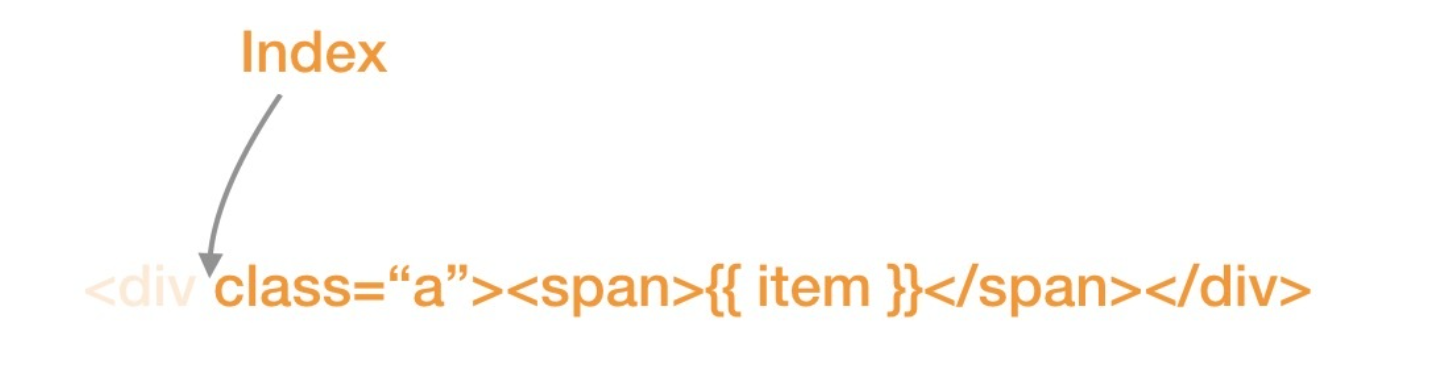
advance 的作用是将分析完的模板子串从字符串模板移除,为了更加直观地说明 advance 的作用,可以通过一副图表示:
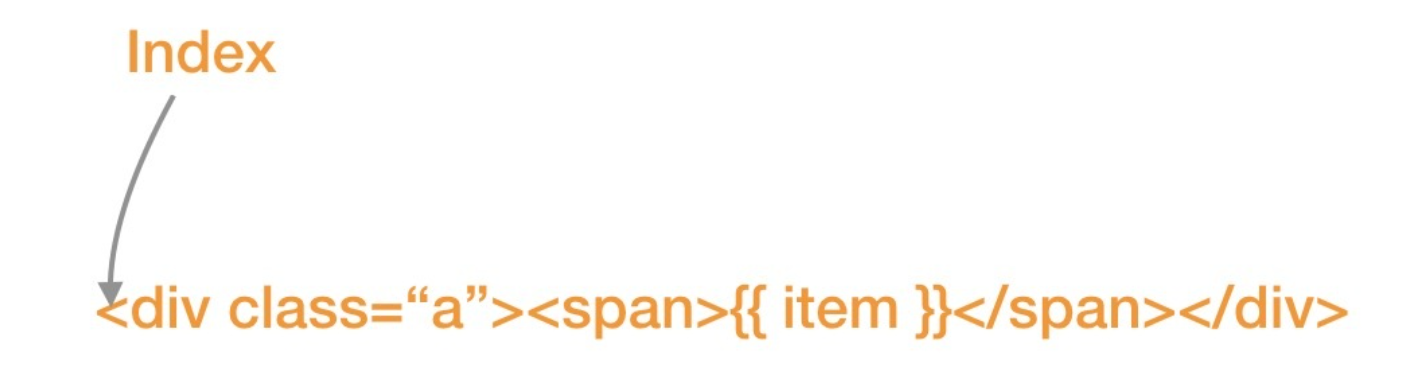
调用 advance 函数,例如:
advance(4)
得到结果:
# 3.4 条件注释节点
接下来我们继续看一下解析条件注释节点的源码,如下:
源码目录:src/compiler/parser/html-parser.js
// http://en.wikipedia.org/wiki/Conditional_comment#Downlevel-revealed_conditional_comment
if (conditionalComment.test(html)) {
  const conditionalEnd = html.indexOf(']>')
  if (conditionalEnd >= 0) {
    advance(conditionalEnd + 2)
    continue
  }
}
2
3
4
5
6
7
8
从阅读源码我们可以得出,这段代码主要做了以下几件事:
- 匹配条件注释节点开始位置
<![ - 获取条件注释节点的结束位置
]>的索引值 - 存在条件注释节点结束位置标记
]>,直接从模板中移除条件注释节点,继续循环解析
# 3.5 Doctype节点
接下来我们继续看一下解析 Doctype 节点的源码,如下:
源码目录:src/compiler/parser/html-parser.js
// Doctype:
const doctypeMatch = html.match(doctype)
if (doctypeMatch) {
  advance(doctypeMatch[0].length)
  continue
}
2
3
4
5
6
这段代码主要做了两件事:
- 匹配
Doctype节点,如果匹配成功doctypeMatch的值是一个数组,数组的第一项保存着整个匹配项的字符串,即整个Doctype标签的字符串,否则doctypeMatch的值为null - 存在
Doctype节点,直接从模板中移除Doctype节点,继续循环解析
# 3.6 开始标签
接下来我们继续看一下解析开始标签的源码,如下:
源码目录:src/compiler/parser/html-parser.js
 // Start tag:
const startTagMatch = parseStartTag()
if (startTagMatch) {
  handleStartTag(startTagMatch)
  if (shouldIgnoreFirstNewline(startTagMatch.tagName, html)) {
    advance(1)
  }
  continue
}
2
3
4
5
6
7
8
9
解析开始标签的代码主要,做了以下三件事:
获取开始标签
处理开始标签
检测是否应该忽略元素内容的第一个换行符
下面我们对这类操作的源码进行详细分析。
# 3.6.1 parseStartTag
首先调用 parseStartTag 函数,解析开始标签,源码如下:
源码目录:src/compiler/parser/html-parser.js
/**
 * 解析开始标签
 */
function parseStartTag () {
  const start = html.match(startTagOpen)
  if (start) {
    const match = {
      tagName: start[1],
      attrs: [],
      start: index
    }
    advance(start[0].length)
    let end, attr
    while (!(end = html.match(startTagClose)) && (attr = html.match(dynamicArgAttribute) || html.match(attribute))) {
      attr.start = index
      advance(attr[0].length)
      attr.end = index
      match.attrs.push(attr)
    }
    if (end) {
      match.unarySlash = end[1]
      advance(end[0].length)
      match.end = index
      return match
    }
  }
}
2
3
4
5
6
7
8
9
10
11
12
13
14
15
16
17
18
19
20
21
22
23
24
25
26
27
parseStartTag 一开始通过下面语句, 来匹配开始标签。
const start = html.match(startTagOpen)
关于 startTagOpen 正则表达式的匹配我们举个例子来说明,例如有下面的html需要匹配:
<p></p>
通过上面的正则表达式匹配的结果,如下:
start = ['<p', 'p']
接下来,如果匹配到了开始标签,就执行 if 语句, if 一开始就定义了一个常量 match 如下:
const match = {
  tagName: start[1],
  attrs: [],
  start: index
}
2
3
4
5
通过前面对正则表达式的分析我们可以得到,match 最终的形式如下:
const match = {
  tagName: 'p',
  attrs: [],
  start: index // 当前字符流读入位置在整个 html 字符串中的相对位置
}
2
3
4
5
接着开始标签的开始部分就匹配完成了,所以要调用 advance 函数,参数为 start[0].length,即匹配到的字符串的长度,在我们这个例子中即为2。
接下来是一个循环语句,代码如下:
let end, attr
while (!(end = html.match(startTagClose)) && (attr = html.match(dynamicArgAttribute) || html.match(attribute))) {
  attr.start = index
  advance(attr[0].length)
  attr.end = index
  match.attrs.push(attr)
}
2
3
4
5
6
7
while 循环执行的的条件是:
1.没有匹配到开始标签的结束部分(/> 、 >)
2.匹配到了开始标签中的动态属性
3.匹配到了开始标签中的属性
我们还是以下面简单的例子,来分析这段代码,如下:
<p v-for="item in list"></p>
我们针对这个例子,匹配到的 end 和 attr分别如下:
end = [
  0: ">",
	1: ""
]
attr = [
  0: ' v-for="item in list"',
  1: "v-for",
  2: "=",
  3: "item in list",
  4: undefined,
  5: undefined
]
2
3
4
5
6
7
8
9
10
11
12
接下来在循环体内做了两件事,首先调用 advance 函数,参数为 attr[0].length 即整个属性的长度。然后会将此次循环匹配到的结果 push 到前面定义的 match 对象的 attrs 数组中。
最后是处理匹配到了开始标签的结束部分即 (/> 、 >),代码如下:
if (end) {
  match.unarySlash = end[1]
  advance(end[0].length)
  match.end = index
  return match
}
2
3
4
5
6
此处对于 end[1] 可能有两种情况,如下:
- 情况一
<p v-for="item in list"></p>
这种情况下匹配到的 end 为:
end = [
  0: ">",
	1: ""
]
2
3
4
- 情况二
<p v-for="item in list"/>
而在此类情况下匹配到的 end 为:
end = [
  0: "/>",
	1: "/"
]
2
3
4
对于 if 语句中的逻辑,经过上面的分析,我们可以清楚的知道,它主要做了以下几件事:
- 给
match添加unarySlash值为 '/' 或 '' - 调用
advance更新index的值 - 给
match添加end属性等于结束位置的索引
以上面的例子 <p v-for="item in list"></p>,执行完 parseStartTag 方法我们得到的 startTagMatch 如下:
match = {
  tagName: 'p',
  attrs: [
    [
      ' v-for="item in list"',
      'v-for',
      '=',
      'item in list',
      undefined,
      undefined
    ]
  ],
  start: index, // 相对模板字符串开始位置
  unarySlash: undefined,
  end: index // 相对模板字符串结束位置
}
2
3
4
5
6
7
8
9
10
11
12
13
14
15
16
# 3.6.2 handleStartTag
我们回到对开始标签的 parse 部分,接下来调用 handleStartTag 函数用来处理开始标签的解析结果,所以它接收 parseStartTag 函数的返回值作为参数,代码如下:
源码目录:src/compiler/parser/html-parser.js
/**
 * 处理解析结果
 * @param {解析后的开始标签} match
 */
function handleStartTag (match) {
  const tagName = match.tagName
  const unarySlash = match.unarySlash

  if (expectHTML) {
    if (lastTag === 'p' && isNonPhrasingTag(tagName)) {
      parseEndTag(lastTag)
    }
    if (canBeLeftOpenTag(tagName) && lastTag === tagName) {
      parseEndTag(tagName)
    }
  }

  const unary = isUnaryTag(tagName) || !!unarySlash

  const l = match.attrs.length
  const attrs = new Array(l)
  for (let i = 0; i < l; i++) {
    const args = match.attrs[i]
    const value = args[3] || args[4] || args[5] || ''
    const shouldDecodeNewlines = tagName === 'a' && args[1] === 'href'
    ? options.shouldDecodeNewlinesForHref
    : options.shouldDecodeNewlines
    attrs[i] = {
      name: args[1],
      value: decodeAttr(value, shouldDecodeNewlines)
    }
    if (process.env.NODE_ENV !== 'production' && options.outputSourceRange) {
      attrs[i].start = args.start + args[0].match(/^\s*/).length
      attrs[i].end = args.end
    }
  }

  if (!unary) {
    stack.push({ tag: tagName, lowerCasedTag: tagName.toLowerCase(), attrs: attrs, start: match.start, end: match.end })
    lastTag = tagName
  }

  if (options.start) {
    options.start(tagName, attrs, unary, match.start, match.end)
  }
}
2
3
4
5
6
7
8
9
10
11
12
13
14
15
16
17
18
19
20
21
22
23
24
25
26
27
28
29
30
31
32
33
34
35
36
37
38
39
40
41
42
43
44
45
46
handleStartTag 方法一开始就定义了两个常量为 tagName 和 unarySlash,分别代表 标签名 和 一元斜杠 ,如下:
// 获取标签名
const tagName = match.tagName
// 获取一元斜杠
const unarySlash = match.unarySlash
2
3
4
说明:关于 此处if,由于包含了结束标签的处理逻辑,我们会在下一节分析完后,回过头来再分析这一部分 。
我们继续往下看,接下来又是定义三个常量,如下:
const unary = isUnaryTag(tagName) || !!unarySlash
const l = match.attrs.length
const attrs = new Array(l)
2
3
这三个常量分别代表:
- unary:是否为一元标签,其中
isUnaryTag判断是否是一元原生标签,!!unarySlash判断自定义标签和组件 l:属性的个数attrs:存储属性
我们继续往下看,接下来是执行循环体,格式化 match.attrs 数组,并将格式化后的数据存储到常量 attrs 中,代码如下:
for (let i = 0; i < l; i++) {
  const args = match.attrs[i]
  const value = args[3] || args[4] || args[5] || ''
  const shouldDecodeNewlines = tagName === 'a' && args[1] === 'href'
  ? options.shouldDecodeNewlinesForHref
  : options.shouldDecodeNewlines
  attrs[i] = {
    name: args[1],
    value: decodeAttr(value, shouldDecodeNewlines)
  }
  if (process.env.NODE_ENV !== 'production' && options.outputSourceRange) {
    attrs[i].start = args.start + args[0].match(/^\s*/).length
    attrs[i].end = args.end
  }
}
2
3
4
5
6
7
8
9
10
11
12
13
14
15
此处的循环主要操作为:
- 获取每一个属性
- 获取属性值 ,例如
'item in list' - 获取解码函数
- 对属性值进行
html实体的解码,并给attrs添加数据项
我们继续往下分析源码,如下:
if (!unary) {
  stack.push({ tag: tagName, lowerCasedTag: tagName.toLowerCase(), attrs: attrs, start: match.start, end: match.end })
  lastTag = tagName
}
2
3
4
这段代码的主要作用是:如果开始标签是非一元标签,则将该开始标签的信息入栈,即 push 到 stack 数组中,并将 lastTag 的值设置为该标签名。
最后调用了 options.start 回调函数,并传入一些参数,源码如下:
if (options.start) {
  options.start(tagName, attrs, unary, match.start, match.end)
}
2
3
说明:
关于 stack,我们会在后面的小节中分析 。
关于 options.start 回调函数,我们会在下面的小节中介绍。
# 3.7 结束标签
接下来我们继续看一下解析结束标签的源码,如下:
源码目录:src/compiler/parser/html-parser.js
// End tag:
const endTagMatch = html.match(endTag)
if (endTagMatch) {
  const curIndex = index
  advance(endTagMatch[0].length)
  parseEndTag(endTagMatch[1], curIndex, index)
  continue
}
2
3
4
5
6
7
8
这段代码首先调用 html 字符串的 match 函数匹配正则 endTag,将结果保存在常量 endTagMatch 中。正则 endTag 用来匹配结束标签,并且拥有一个捕获组用来捕获标签名字,比如有如下 html 字符串:
<p v-for="item in list"></p>
则匹配后 endTagMatch 如下:
endTagMatch = [
  '</p>',
  'p'
]
2
3
4
接着调用 advance(endTagMatch[0].length) 更新 index 的索引值。
最后调用 parseEndTag(endTagMatch[1], curIndex, index) 解析结束标签,针对上面的例子,parseEndTag 传递的参数分别为:p、结束标签开始的位置、结束标签结束的位置。
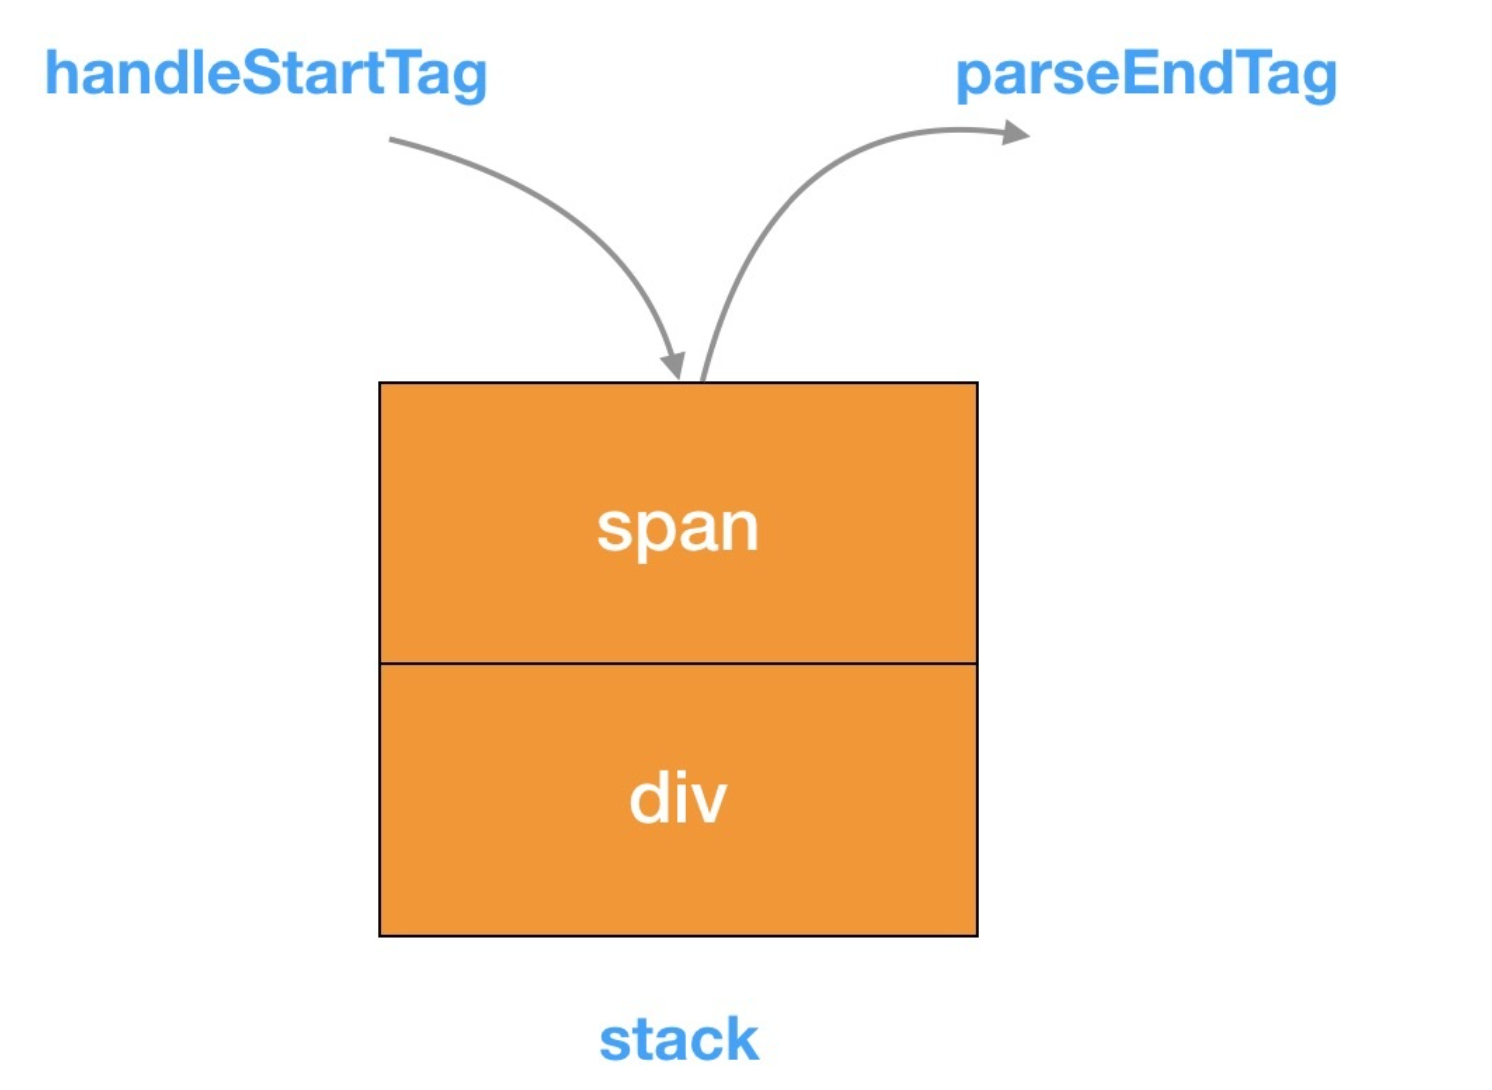
# 3.7.1 stack
在介绍 parseEndTag 之前我们回顾一下在执行 handleStartTag 的时候,对于非一元标签(有 endTag)我们都把它构造成一个对象压入到 stack 中,如图所示:
那么对于闭合标签的解析,就是倒序 stack ,找到第一个和当前 endTag 匹配的元素。如果是正常的标签匹配,那么 stack 的最后一个元素应该和当前匹配,但是考虑到如下错误情况:
<div><span></div>
这个时候当 endTag 为 </div> 的时候,从 stack 尾部找到的标签是 <span>,就不能匹配,因此这种情况会报警告。匹配后把栈到 pos 位置的都弹出,并从 stack 尾部拿到 lastTag 。
# 3.7.2 parseEndTag
结束标签解析主要是在 parseEndTag 方法中完成的,下面我们详细分析一下 parseEndTag,源码如下:
源码目录:src/compiler/parser/html-parser.js
/**
 * 解析结束标签
 * @param {标签名} tagName
 * @param {开始位置} start
 * @param {结束位置} end
 */
function parseEndTag (tagName, start, end) {
  let pos, lowerCasedTagName
  if (start == null) start = index
  if (end == null) end = index

  // Find the closest opened tag of the same type
  if (tagName) {
    lowerCasedTagName = tagName.toLowerCase()
    for (pos = stack.length - 1; pos >= 0; pos--) {
      if (stack[pos].lowerCasedTag === lowerCasedTagName) {
        break
      }
    }
  } else {
    // If no tag name is provided, clean shop
    pos = 0
  }

  if (pos >= 0) {
    // Close all the open elements, up the stack
    for (let i = stack.length - 1; i >= pos; i--) {
      if (process.env.NODE_ENV !== 'production' &&
          (i > pos || !tagName) &&
          options.warn
         ) {
        options.warn(
          `tag <${stack[i].tag}> has no matching end tag.`,
          { start: stack[i].start, end: stack[i].end }
        )
      }
      if (options.end) {
        options.end(stack[i].tag, start, end)
      }
    }

    // Remove the open elements from the stack
    stack.length = pos
    lastTag = pos && stack[pos - 1].tag
  } else if (lowerCasedTagName === 'br') {
    if (options.start) {
      options.start(tagName, [], true, start, end)
    }
  } else if (lowerCasedTagName === 'p') {
    if (options.start) {
      options.start(tagName, [], false, start, end)
    }
    if (options.end) {
      options.end(tagName, start, end)
    }
  }
}
2
3
4
5
6
7
8
9
10
11
12
13
14
15
16
17
18
19
20
21
22
23
24
25
26
27
28
29
30
31
32
33
34
35
36
37
38
39
40
41
42
43
44
45
46
47
48
49
50
51
52
53
54
55
56
57
我们通过以上源码可以知道 parseEndTag 函数主要有三个作用:
- 检测是否缺少闭合标签
- 处理
stack栈中剩余的标签 - 解析
br与p标签,与浏览器的行为相同
接下来我们就逐步分析 parseEndTag 函数的代码,从而明白 parseEndTag 函数是如何完成这些事情的。
首先函数一开始就定义了一些变量,如下:
let pos, lowerCasedTagName
pos:判断html字符串是否缺少结束标签lowerCasedTagName:存储tagName的小写格式
接下来是两个 if 语句,分别判断 start 和 end 不存在时,将这两个变量的值设置为当前字符流的读入位置,即 index,源码如下:
if (start == null) start = index
if (end == null) end = index
2
在 handleStartTag 函数中,当时我们预留了一个 if 没有分析,现在我们可以看一下这段代码了,如下:
if (expectHTML) {
  if (lastTag === 'p' && isNonPhrasingTag(tagName)) {
    parseEndTag(lastTag)
  }
  if (canBeLeftOpenTag(tagName) && lastTag === tagName) {
    parseEndTag(tagName)
  }
}
2
3
4
5
6
7
8
通过前面的分析我们知道 lastTag 引用的是 stack 栈顶的元素,也就是最近(或者说上一次)遇到的开始标签。
首先当标签是 p 并且是段落式内容,执行 parseEndTag(lastTag) ,例如下面的 html :
<p><h2></h2></p>
通过执行 parseEndTag(lastTag),最终生成的 html 为:
<p></p><h2></h2><p></p>
这种解析行为,目的是为了和浏览器解析同类 html 保持一致。
说明: html 元素都拥有一个或多个内容模型(content model),其中 p 标签本身的内容模型是 流式内容(Flow content),并且 p 标签的特性是只允许包含 段落式内容(Phrasing content)
接下来的 if 语句的条件是canBeLeftOpenTag(tagName) && lastTag === tagName,即当前正在解析的标签是一个可以省略结束标签的标签,并且与上一次解析到的开始标签相同,例如:
<p>one
<p>two
2
我们补充讲解了 handleStartTag 函数中遗留未讲解的内容,我们回过头来继续看 parseEndTag 函数的代码,接下来是这段代码:
// Find the closest opened tag of the same type
if (tagName) {
  lowerCasedTagName = tagName.toLowerCase()
  for (pos = stack.length - 1; pos >= 0; pos--) {
    if (stack[pos].lowerCasedTag === lowerCasedTagName) {
      break
    }
  }
} else {
  // If no tag name is provided, clean shop
  pos = 0
}
2
3
4
5
6
7
8
9
10
11
12
tagName 存在的情况下,这段代码主要的逻辑是:
- 将标签名转为小写格式
- 寻找当前解析的结束标签所对应的开始标签在
stack栈中的位置
tagName 不存在的情况下,将 pos 赋值为 0
我们继续往下分析代码,如下:
if (pos >= 0) {
  // Close all the open elements, up the stack
  for (let i = stack.length - 1; i >= pos; i--) {
    // 如果发现 stack 数组中存在索引大于 pos 的元素,那么该元素一定是缺少闭合标签的
    if (process.env.NODE_ENV !== 'production' &&
        (i > pos || !tagName) &&
        options.warn
       ) {
      options.warn(
        `tag <${stack[i].tag}> has no matching end tag.`,
        { start: stack[i].start, end: stack[i].end }
      )
    }
    // 闭合标签,为了保证解析结果的正确性
    if (options.end) {
      options.end(stack[i].tag, start, end)
    }
  }

  // Remove the open elements from the stack
  // 匹配后把栈到 pos 位置的都弹出,并从 stack 尾部拿到 lastTag
  stack.length = pos
  lastTag = pos && stack[pos - 1].tag
} else if (lowerCasedTagName === 'br') {
  /* */
} else if (lowerCasedTagName === 'p') {
  /* */
}
2
3
4
5
6
7
8
9
10
11
12
13
14
15
16
17
18
19
20
21
22
23
24
25
26
27
28
在 if 语句块内开启一个 for 循环,同样是从后向前遍历 stack 数组,如果发现 stack 数组中存在索引大于 pos 的元素,那么该元素一定是缺少闭合标签的,这个时候如果是在非生产环境那么 Vue 便会打印一句警告,告诉你缺少闭合标签。除了打印一句警告之外,随后会调用 options.end(stack[i].tag, start, end) 立即将其闭合,这是为了保证解析结果的正确性。最后更新 stack 栈以及 lastTag。
下来我们看一下后面两个 else if 语句块,如下:
if (pos >= 0) {
  /* */
} else if (lowerCasedTagName === 'br') {
  if (options.start) {
    options.start(tagName, [], true, start, end)
  }
} else if (lowerCasedTagName === 'p') {
  if (options.start) {
    options.start(tagName, [], false, start, end)
  }
  if (options.end) {
    options.end(tagName, start, end)
  }
}
2
3
4
5
6
7
8
9
10
11
12
13
14
可以发现,如果 tagName 不存在,那么 pos 将始终等于 0,这样 pos >= 0 将永远成立,所以要想使得 pos < 0 成立,那么 tagName 参数是必然存在的。也就是说 pos 要想小于 0,那么必须要执行 for 循环,可以发现:当 tagName 没有在 stack 栈中找到对应的开始标签时,pos 为 -1。这样 pos >= 0 的条件就不成立了,此时就会判断 else if 分支。
我们知道 tagName 是当前正在解析的结束标签,结束标签竟然没有找到对应的开始标签,那么也就是说,只写了结束标签而没写开始标签,如下:
<body>
  </div>
  </br>
  </p>
</body>
2
3
4
5
也就是说,当你写了 br 标签的结束标签:</br> 或 p 标签的结束标签 </p> 时,解析器能够正常解析他们,其中对于 </br> 会将其解析为正常的 <br> 标签,而 </p> 标签也会正常解析为 <p></p>。
可以发现对于 </br> 和 </p> 标签浏览器可以将其正常解析为 <br> 以及 <p></p>,而对于 </div> 浏览器会将其忽略。所以 Vue 的 parser 与浏览器的行为是一致的。
最后调用了 options.end 回调函数,并传入一些参数。
说明:
关于 options.end 回调函数,我们会在下面的小节中介绍。
# 3.8 文本
接下来我们看一下解析文本节点的源码,如下:
源码目录:src/compiler/parser/html-parser.js
while (html) {
  last = html
  if (!lastTag || !isPlainTextElement(lastTag)) {

    let textEnd = html.indexOf('<')

    if (textEnd === 0) {
      /* */
    if (textEnd >= 0) {
      rest = html.slice(textEnd)
      while (
        !endTag.test(rest) &&
        !startTagOpen.test(rest) &&
        !comment.test(rest) &&
        !conditionalComment.test(rest)
      ) {
        // < in plain text, be forgiving and treat it as text
        next = rest.indexOf('<', 1)
        if (next < 0) break
        textEnd += next
        rest = html.slice(textEnd)
      }
      text = html.substring(0, textEnd)
    }

    if (textEnd < 0) {
      text = html
    }

    if (text) {
      advance(text.length)
    }

    if (options.chars && text) {
      options.chars(text, index - text.length, index)
    }
  } else { //  即将 parse 的内容是在纯文本标签里 (script,style,textarea)
    let endTagLength = 0
    const stackedTag = lastTag.toLowerCase()
    const reStackedTag = reCache[stackedTag] || (reCache[stackedTag] = new RegExp('([\\s\\S]*?)(</' + stackedTag + '[^>]*>)', 'i'))
    const rest = html.replace(reStackedTag, function (all, text, endTag) {
      endTagLength = endTag.length
      if (!isPlainTextElement(stackedTag) && stackedTag !== 'noscript') {
        text = text
          .replace(/<!\--([\s\S]*?)-->/g, '$1') // #7298
          .replace(/<!\[CDATA\[([\s\S]*?)]]>/g, '$1')
      }
      if (shouldIgnoreFirstNewline(stackedTag, text)) {
        text = text.slice(1)
      }
      if (options.chars) {
        options.chars(text)
      }
      return ''
    })
    index += html.length - rest.length
    html = rest
    parseEndTag(stackedTag, index - endTagLength, index)
  }

  // 如果两者相等,则说明字符串 html 在经历循环体的代码之后没有任何改变,此时会把 html 字符串作为纯文本对待
  if (html === last) {
    options.chars && options.chars(html)
    if (process.env.NODE_ENV !== 'production' && !stack.length && options.warn) {
      options.warn(`Mal-formatted tag at end of template: "${html}"`, { start: index + html.length })
    }
    break
  }
}
2
3
4
5
6
7
8
9
10
11
12
13
14
15
16
17
18
19
20
21
22
23
24
25
26
27
28
29
30
31
32
33
34
35
36
37
38
39
40
41
42
43
44
45
46
47
48
49
50
51
52
53
54
55
56
57
58
59
60
61
62
63
64
65
66
67
68
69
在分析之前我们还是以一个简单的例子来讲解,源码如下:
html = 'x<xx<xxx'
首先获取到的 textEnd 的值为1,然后执行下列语句:
rest = html.slice(textEnd)
执行这条语句即相当于执行 html.slice(1),获取到的 rest 的值为 <xx<xxx。
接下来循环处理文本,循环成立的条件是 不存在结束标签并不存在开始标签并不存在注释标签并不存在条件注释标签,循环体中首先是获取下一个 < 即:
next = rest.indexOf('<', 1)
在本案例中 rest 为 <xx<xxx ,执行上面的语句即从 <xx<xxx 从字符串的第二个字符开始查找,所以 next 为 3。
接下来判断 next 是否小于 0,小于 0 说明 都是文本,然后跳出循环。如果不小于0 ,说明还存在 < ,继续执行下列代码:
textEnd += next
rest = html.slice(textEnd)
2
还是以上面案例来进行分析,这两句代码的作用是
(1)、更新textEnd: textEnd 开始为1,此时 next 为 3,所以执行完第一句 textEnd 为 4 。
(2)、更新rest字符串:此时 html 为 x<xx<xxx,textEnd 为 4,所以执行完第二句截取字符串 rest 为 <xxx 。
此时 textEnd 为 4 ,rest 为 <xxx 继续执行循环,继续获取 next 即 next = rest.indexOf('<', 1) ,所以 next 为 -1 ,条件成立终止循环。
接下执行如下语句:
text = html.substring(0, textEnd)
继续以上面的案例进行分析,此时 textEnd 为 4 ,所以 text 为 x<xx,到此 textEnd >= 0 的情况已经处理完。
接下来是处理 textEnd < 0 的情况,如下:
if (textEnd < 0) {
  text = html
}
2
3
对于 textEnd 小于 0 的情况,处理方式很简单,就将整个 html 字符串作为文本处理就好了。
接下来是更新 html,代码如下:
if (text) {
  advance(text.length)
}
2
3
此时 text 为 x<xx ,text.length 为 4,所以 html 为 <xxx。
最后是调用 options.chars(text, index - text.length, index) 解析文本。
说明:
第一次循环while(html)结束,html='<xxx' 不为空,继续下一个循环,此时 textEnd 为 0,还是执行到 textEnd >= 0,所以执行 text = html.substring(0, textEnd) ,即 text = html.substring(0, 0) 获取到的 text 为空,所以直接执行到最后 if (html === last)
接下来我们再看一下最后一个 if 语句,如下:
if (html === last) {
  options.chars && options.chars(html)
  if (process.env.NODE_ENV !== 'production' && !stack.length && options.warn) {
    options.warn(`Mal-formatted tag at end of template: "${html}"`, { start: index + html.length })
  }
  break
}
2
3
4
5
6
7
此时 html = last = '<xxx' ,所以直接被当作文本处理。
说明:
关于在开发环境中报警告的条件,关键在于第二个条件:!stack.length,stack 栈为空代表着标签被处理完毕了,但此时仍然有剩余的字符串未处理,举例子假设 html 字符串为:,在解析这个字符串时首先会成功解析div的开始标签,此时stack栈中将存有div的开始标签,接着会成功解析div的结束标签,此时stack栈会被清空,接着会解析剩余的字符串,此时由于 stack 栈被清空了,所以将满足上面 if 语句的判断条件。这时会打印警告信息,提示你 html 字符串的结尾不符合标签格式,很显然字符串 ` 是不合法的。
最后我们还剩余一个 else 没有分析,这里代码的作用是对内容是在纯文本标签里 (script,style,textarea)的文本解析,代码如下:
//  即将 parse 的内容是在纯文本标签里 (script,style,textarea)
let endTagLength = 0
const stackedTag = lastTag.toLowerCase()
// 这里我们只处理textarea元素, 其他的两种Vue 会警告,不提倡这么写
// 缓存匹配 textarea 的正则表达式
const reStackedTag = reCache[stackedTag] || (reCache[stackedTag] = new RegExp('([\\s\\S]*?)(</' + stackedTag + '[^>]*>)', 'i'))
// 清除匹配项,处理text,以 <textarea>xxx</textarea> 为例,其中all 为 xxx</textarea>, text 为 xxx, endTag 为 </textarea>
const rest = html.replace(reStackedTag, function (all, text, endTag) {
  // 要匹配的html字符串的长度
  endTagLength = endTag.length
  if (!isPlainTextElement(stackedTag) && stackedTag !== 'noscript') {
    text = text
    // 匹配<!--xxx-->
      .replace(/<!\--([\s\S]*?)-->/g, '$1') // #7298
    // 匹配<!CDATAxxx>
      .replace(/<!\[CDATA\[([\s\S]*?)]]>/g, '$1')
  }
  // 忽略 <pre> 标签和 <textarea> 标签的内容中的第一个换行符
  if (shouldIgnoreFirstNewline(stackedTag, text)) {
    text = text.slice(1)
  }
  // 处理文本内容,并使用 options.char 方法
  if (options.chars) {
    options.chars(text)
  }
  return ''
})
// 更新index
index += html.length - rest.length
// 更新html
html = rest
// 解析结束tag
parseEndTag(stackedTag, index - endTagLength, index)
2
3
4
5
6
7
8
9
10
11
12
13
14
15
16
17
18
19
20
21
22
23
24
25
26
27
28
29
30
31
32
33
我们这里以下面 html 模板为例来分析上面代码:
<textarea>xxx</textarea>
第一次 while(html) 循环后, html 为 xxx</textarea>,lastTag 为 textarea ,接下来第二次 while(html) 代码会执行到上面的 else 语句体中。
首先通过执行 const stackedTag = lastTag.toLowerCase() 这条语句将 lastTag 转为小写字符串标签并付值给 stackedTag 。
接下来创建正则表达式,并且使用 reCache[stackedTag] 做了缓存,该正则表达式中使用到了 stackedTag 常量,我们本案例的纯文本标签是 textarea,那么 stackedTag 常量的值也应该是 textarea,所以此时正则表达式如下:
const reStackedTag = reCache[stackedTag] || (reCache[stackedTag] = new RegExp('([\\s\\S]*?)(</textarea[^>]*>)', 'i')
所以正则 reStackedTag 的作用是用来匹配纯文本标签的内容以及结束标签的。
'<textarea>xxx</textarea>'.match(reStackedTag)
// 执行结果为
// [
//    0: "<textarea>xxx</textarea>",
//  	1: "<textarea>xxx",
//  	2: "</textarea>"
// ]
2
3
4
5
6
7
接下来通过 replace 清除匹配项,处理文本,源码如下:
const rest = html.replace(reStackedTag, function (all, text, endTag) {
  endTagLength = endTag.length
  if (!isPlainTextElement(stackedTag) && stackedTag !== 'noscript') {
    text = text
      .replace(/<!\--([\s\S]*?)-->/g, '$1') // #7298
      .replace(/<!\[CDATA\[([\s\S]*?)]]>/g, '$1')
  }
  if (shouldIgnoreFirstNewline(stackedTag, text)) {
    text = text.slice(1)
  }
  if (options.chars) {
    options.chars(text)
  }
  return ''
})
2
3
4
5
6
7
8
9
10
11
12
13
14
15
replace 的第二个参数是函数,参数列表我们以 xxx</textarea> 为例,其中 all 为 xxx</textarea> , text 为 xxx , endTag 为 </textarea> ,函数内部首先获取到结束标签的长度,然后判断纯文本标签不是 script 标签、style 标签以及 textarea 标签并且不是 noscript,替换 text 的内容,在我们这个案例中 text 为 xxx ,不会执行 if 这个 case 。
我们继续往下看 shouldIgnoreFirstNewline 的作用是忽略<pre> 标签和 <textarea> 标签的内容中的第一个换行符,在我们这个案例中 stackedTag 为 textarea, text 为 xxx ,也不会执行 if 这个 case 。
接下来使用 options.char 方法 处理文本内容,并返回空字符串。
最后更新 index,更新 html,解析结束 tag。