vue源码分析(四) 实例属性和方法
# 1. 概述
在上一章——vue源码分析(三) 整体架构 (opens new window),中我们分析 Vue 的构造函数时,忽略了一些初始化函数,接下来我们将一一分析如下的几个初始化函数。
源码目录: src/core/instance/index.js
mport { initMixin } from './init'
import { stateMixin } from './state'
import { renderMixin } from './render'
import { eventsMixin } from './events'
import { lifecycleMixin } from './lifecycle'

initMixin(Vue) // 初始化Vue
stateMixin(Vue) // 数据绑定,$watch方法
eventsMixin(Vue) // 初始化事件绑定方法
lifecycleMixin(Vue) // 初始化vue 生命周期: 更新 销毁
renderMixin(Vue) // 初始化渲染的函数
2
3
4
5
6
7
8
9
10
11
# 2. initMixin
首先看看 initMixin 定义,如下:
源码目录: `src/core/instance/init.js`
/**
 * 初始化vue
 * @param {Vue构造器} Vue
 */
export function initMixin (Vue: Class<Component>) {
  //初始化函数
  Vue.prototype._init = function (options?: Object) {
    /* */
  }
}
2
3
4
5
6
7
8
9
10
initMixin 方法的主要作用就是给 Vue 实例上添加一个 _init 方法。
说明:关于 _init 方法具体的源码已经在 vue源码分析(三) 整体架构 (opens new window) 章节中的 初始化 部分有详细分析,请移步查看!
# 3. stateMixin
接下来我们看一下 stateMixin 函数的定义,如下:
源码目录: src/core/instance/state.js
/**
 * 数据绑定,$watch方法
 * @param {vue构造器} Vue
 */
export function stateMixin (Vue: Class<Component>) {
  // flow somehow has problems with directly declared definition object
  // when using Object.defineProperty, so we have to procedurally build up
  // the object here.
  const dataDef = {}
  // 重新定义get 和set方法
  dataDef.get = function () { return this._data } // 获取data中的数据
  const propsDef = {}
  propsDef.get = function () { return this._props } // 获取props 数据
  if (process.env.NODE_ENV !== 'production') {
    dataDef.set = function () { //避免替换实例根$data,使用嵌套数据属性代替
      warn(
        'Avoid replacing instance root $data. ' +
        'Use nested data properties instead.',
        this
      )
    }
    propsDef.set = function () { //props 只是可读的数据不可以设置更改
      warn(`$props is readonly.`, this)
    }
  }
  Object.defineProperty(Vue.prototype, '$data', dataDef)
  Object.defineProperty(Vue.prototype, '$props', propsDef)

  // 添加一个数组数据或者对象数据
  Vue.prototype.$set = set
  // 删除一个数组数据或者对象数据
  Vue.prototype.$delete = del

  Vue.prototype.$watch = function (
    expOrFn: string | Function, // 监听的属性
    cb: any, // 监听的属性对应的函数
    options?: Object //参数
  ): Function { /* */ }
2
3
4
5
6
7
8
9
10
11
12
13
14
15
16
17
18
19
20
21
22
23
24
25
26
27
28
29
30
31
32
33
34
35
36
37
38
stateMixin 主要是在 Vue.prototype 添加一下一些属性和方法:
$data属性:Vue实例观察的数据对象,代理是_data这个实例属性,是一个只读属性。$props属性:当前组件接收到的props对象,代理是_props这个实例属性,是一个只读属性。$set方法:向响应式对象中添加一个属性,并确保这个新属性同样是响应式的,且触发视图更新。$delete方法:删除对象的属性。如果对象是响应式的,确保删除能触发更新视图。$watch方法:观察Vue实例上的一个表达式或者一个函数计算结果的变化。
说明:关于 ES5 的 Object.defineProperty 方法,我们这里不做详细说明,可以移步至这里 (opens new window)学习。
# 4. eventsMixin
接下来我们再分析 eventsMixin 函数,先看一下的它的定义,如下:
源码目录: src/core/instance/events.js
/**
 * 初始化事件绑定方法
 * @param {Vue构造函数} Vue
 */
export function eventsMixin (Vue: Class<Component>) {
  Vue.prototype.$on = function (event: string | Array<string>, fn: Function): Component { /* */ }

  Vue.prototype.$once = function (event: string, fn: Function): Component { /* */ }

  Vue.prototype.$off = function (event?: string | Array<string>, fn?: Function): Component { /* */ }

  Vue.prototype.$emit = function (event: string): Component { /* */ }
}
2
3
4
5
6
7
8
9
10
11
12
13
stateMixin 这个方法也是在 Vue.prototype 添加一些方法,主要有:
$on方法:监听当前实例上的自定义事件。事件可以由vm.$emit触发。$once方法:监听一个自定义事件,但是只触发一次。一旦触发之后,监听器就会被移除。$off方法:移除自定义事件监听器。$emit方法:触发当前实例上的事件。附加参数都会传给监听器回调。
# 5. lifecycleMixin
接着就是 lifecycleMixin 函数,老规矩我们还是先从函数的定义开始,代码如下:
源码目录: src/core/instance/lifecycle.js
/**
 * 初始化vue 更新/销毁
 * @param {Vue构造器} Vue
 */
export function lifecycleMixin (Vue: Class<Component>) {
  /**
   * 将vnode转换成dom,渲染在视图中
   * @param {vnode dom虚拟节点} vnode
   * @param {布尔类型的参数是跟ssr相关} hydrating
   */
  Vue.prototype._update = function (vnode: VNode, hydrating?: boolean) { /* */ }

  // 更新观察者数据
  Vue.prototype.$forceUpdate = function () { /* */ }

  // 销毁组建周期函数
  Vue.prototype.$destroy = function () { /* */ }
}
2
3
4
5
6
7
8
9
10
11
12
13
14
15
16
17
18
同上,lifecycleMixin 这个方法也是在 Vue.prototype 添加一些方法,主要有:
_update方法:将vnode转换成dom,渲染在视图中。$forceUpdate方法:迫使Vue实例重新渲染。注意它仅仅影响实例本身和插入插槽内容的子组件,而不是所有子组件。$destroy方法:完全销毁一个实例。清理它与其它实例的连接,解绑它的全部指令及事件监听器。触发beforeDestroy和destroyed的钩子。
# 6. renderMixin
最后是 renderMixin 函数,我们先看一下它的定义,如下:
源码目录: src/core/instance/render.js
/**
 * 初始化渲染的函数
 * @param {Vue构造器} Vue
 */
export function renderMixin (Vue: Class<Component>) {
  // install runtime convenience helpers
  // 给 Vue 原型上添加_x(例如_l)这样的函数
  installRenderHelpers(Vue.prototype)

  // 给 Vue 原型上添加 $nextTick API
  Vue.prototype.$nextTick = function (fn: Function) { /* */ }

  Vue.prototype._render = function (): VNode { /* */ }
}
2
3
4
5
6
7
8
9
10
11
12
13
14
15
这个方法一开始调用了 installRenderHelpers 函数,我们先分析这个函数的主要作用,首先也是从函数的定义入手,如下:
源码目录: src/core/instance/render-helpers/index.js
/**
 * 安装渲染助手
 * @param {参数} target
 */
export function installRenderHelpers (target: any) {
  // 实际上,这意味着使用唯一键将节点标记为静态。* 标志 v-once. 指令
  target._o = markOnce
  // 字符串转数字,如果失败则返回字符串
  target._n = toNumber
  // 将对象或者其他基本数据变成一个字符串
  target._s = toString
  // 根据value 判断是数字,数组,对象,字符串,循环渲染
  target._l = renderList
  // 用于呈现<slot>的运行时帮助程序 创建虚拟slot vonde
  target._t = renderSlot
  // 检测a和b的数据类型,是否是不是数组或者对象,对象的key长度一样即可,数组长度一样即可
  target._q = looseEqual
  // arr数组中的对象,或者对象数组是否和val 相等
  target._i = looseIndexOf
  // 用于呈现静态树的运行时助手,创建静态虚拟vnode
  target._m = renderStatic
  // 用于解析过滤器的运行时助手
  target._f = resolveFilter
  // 检查两个key是否相等,如果不想等返回true 如果相等返回false
  target._k = checkKeyCodes
  // 用于将v-bind="object"合并到VNode的数据中的运行时助手,检查value 是否是对象,并且为value 添加update 事件
  target._b = bindObjectProps
  // 创建一个文本节点 vonde
  target._v = createTextVNode
  // 创建一个节点为空的vnode
  target._e = createEmptyVNode
  // 解决作用域插槽,把对象数组事件分解成对象
  target._u = resolveScopedSlots
  // 判断value 是否是对象,并且为数据 data.on 合并data和value 的on 事件
  target._g = bindObjectListeners
  target._d = bindDynamicKeys
  target._p = prependModifier
}
2
3
4
5
6
7
8
9
10
11
12
13
14
15
16
17
18
19
20
21
22
23
24
25
26
27
28
29
30
31
32
33
34
35
36
37
38
以上代码就是 installRenderHelpers 函数的源码,可以发现,这个函数的作用就是在 Vue.prototype 上添加一系列方法。
说明:这些方法的作用已经在源码注释中有说明具体实现这里不做详细分析,后面都会讲解到。
最后又在也是在 Vue.prototype 添加了 $nextTick 和 _render 两个方法。
# 7. 其他
我们再回到 initGlobalAPI(Vue) 被调用的文件中,这个函数被调用完,有执行了一些代码,如下:
源码目录: src/core/index.js
Object.defineProperty(Vue.prototype, '$isServer', {
  get: isServerRendering
})

Object.defineProperty(Vue.prototype, '$ssrContext', {
  get () {
    /* istanbul ignore next */
    return this.$vnode && this.$vnode.ssrContext
  }
})

// expose FunctionalRenderContext for ssr runtime helper installation
Object.defineProperty(Vue, 'FunctionalRenderContext', {
  value: FunctionalRenderContext
})

Vue.version = '__VERSION__'
2
3
4
5
6
7
8
9
10
11
12
13
14
15
16
17
这里也是在 Vue.prototype 上分别添加了两个只读的属性 $isServer 和 $ssrContext。
最后,在 Vue 构造函数上添加了一个静态属性 version,存储了当前 Vue 的版本号。
# 8. 总结
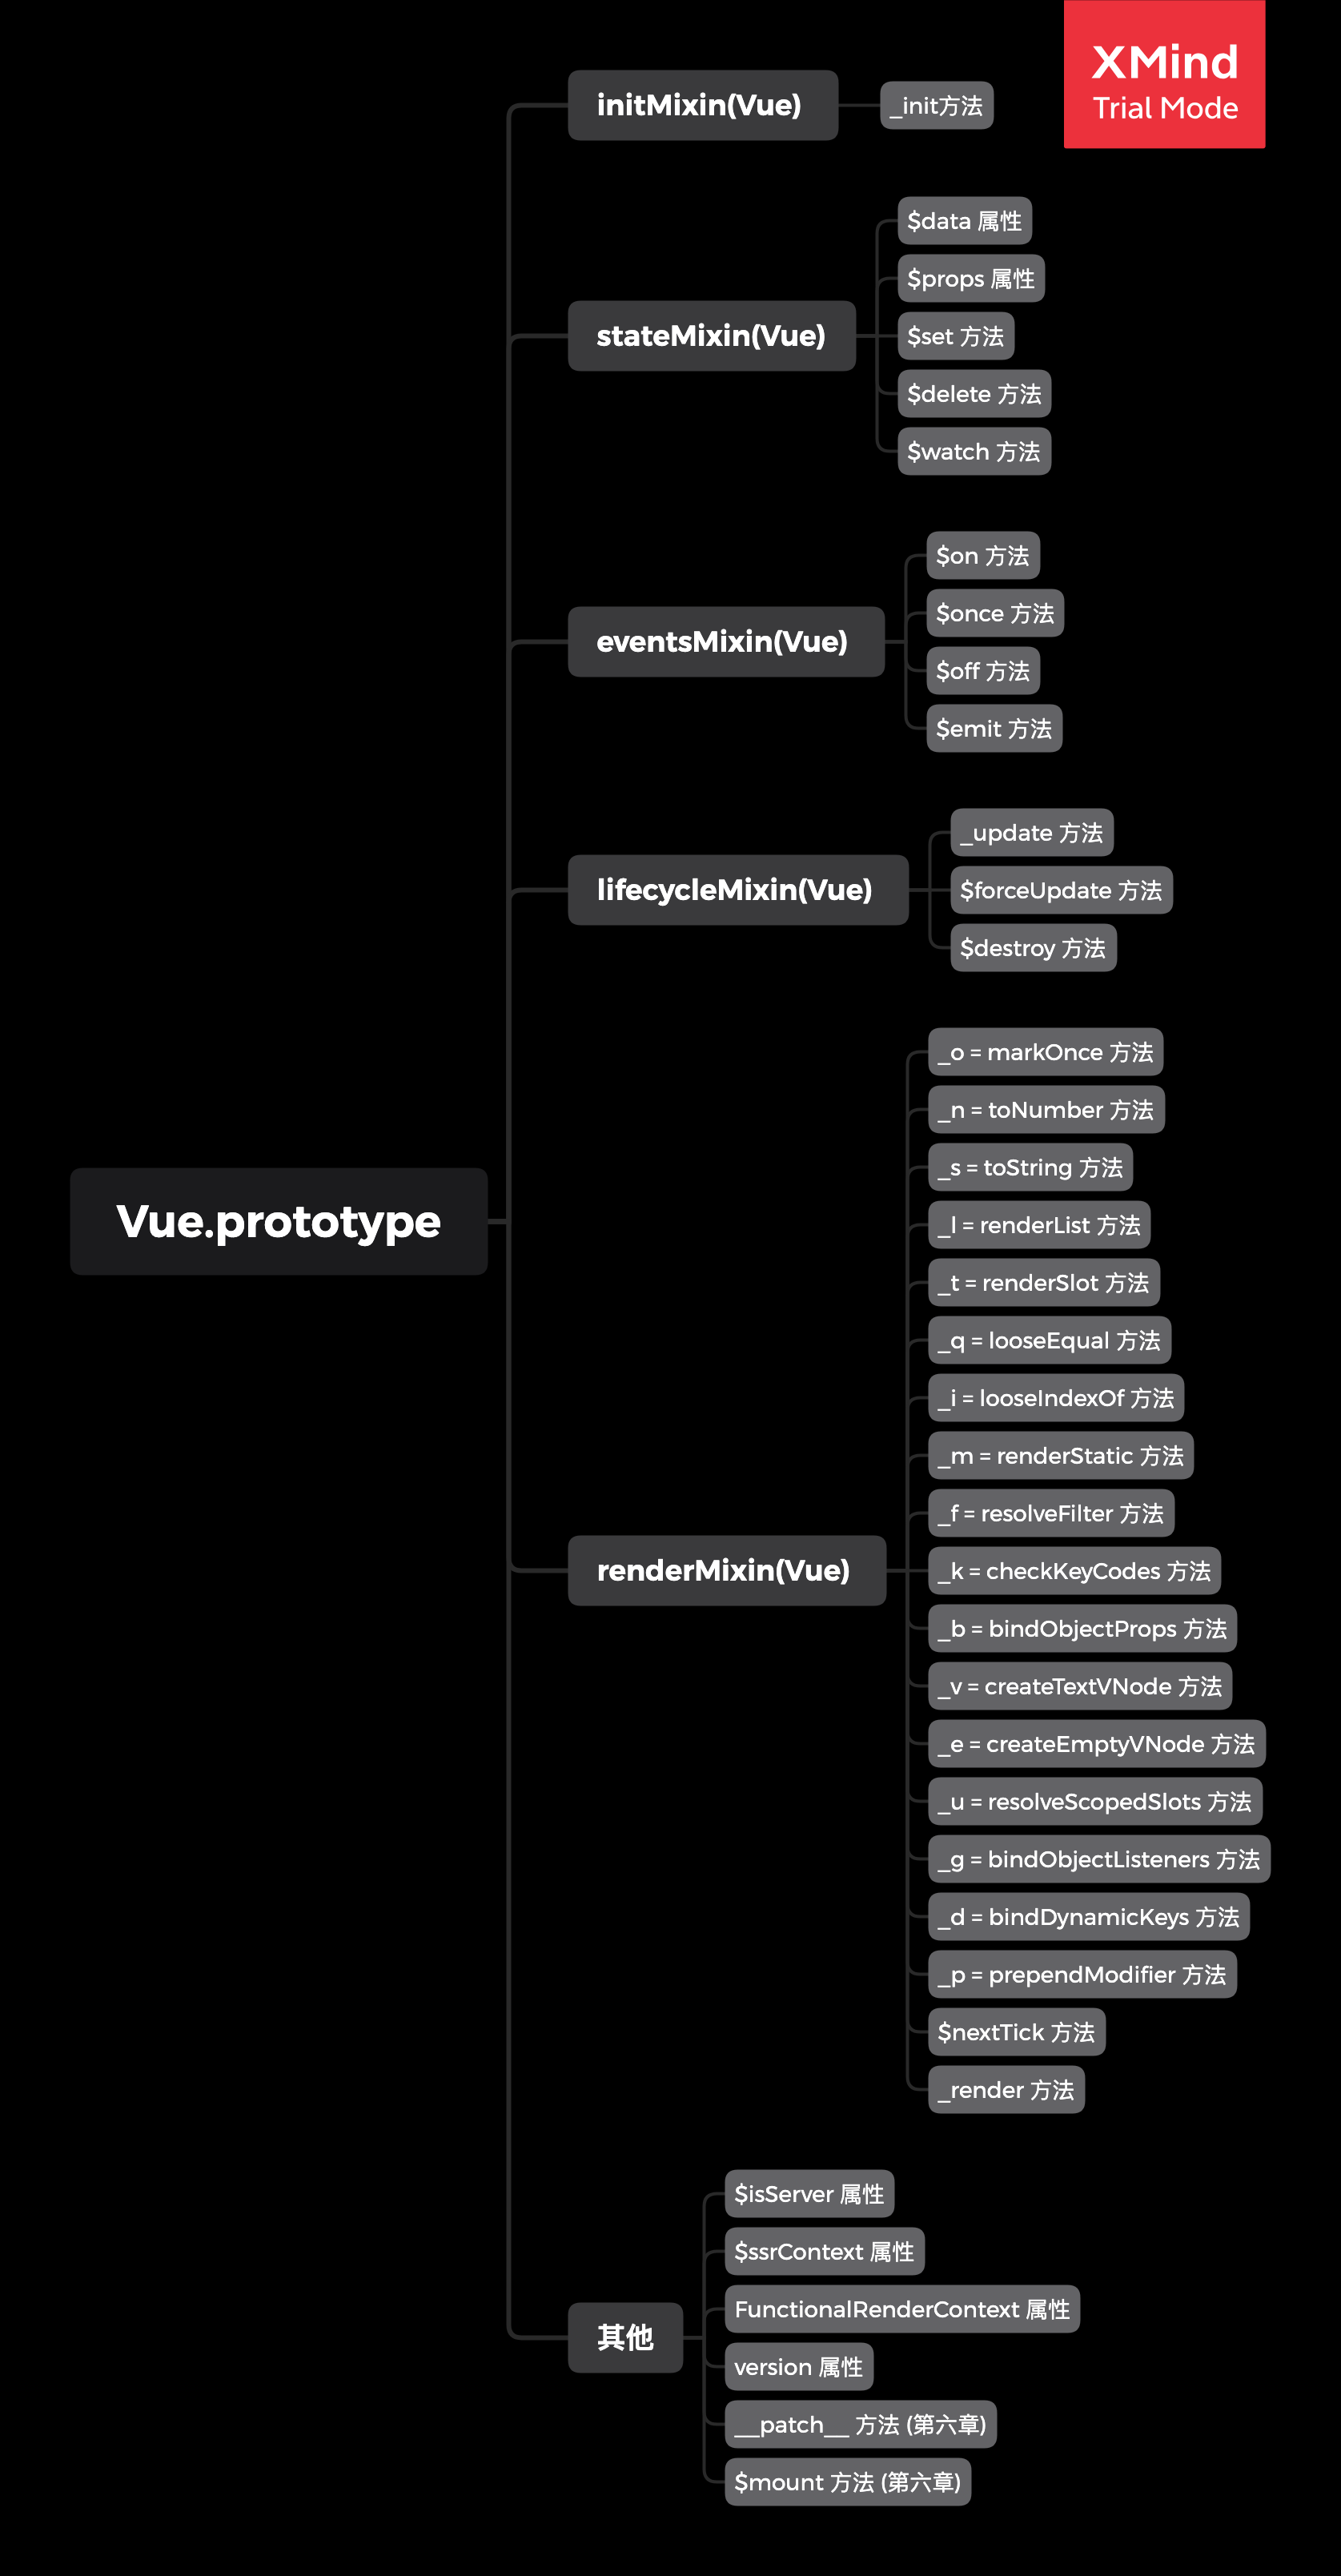
通过我们对上面五个方法的分析,我们可以总结出 Vue.prototype 即 Vue实例上面具体有哪些实例属性和方法,接下来我们已思维导图的方式总结。
说明:在本章节中没有遇到的实例属性和方法我们也会在以后的分析总归纳进来,会在思维导图中标在出来具体的章节。

